
As convenient as our digital tools are, they can sometimes leave us in a tricky situation. Lately, I’ve been contacted a lot regarding a problem with the Outlook inbox and the way it displays received e-mails. Apparently, the inbox doesn’t show who sent the mail in the list view.
Instead, it has the subject or parts of the content of the mail displayed where the sender’s name used to be. This can be quite annoying, and if you’re experiencing the same type of problem in Outlook I suggest you stick around as we’re going to look at how you can restore the initial view that most of us have grown accustomed to.
You can make your Outlook inbox display the sender’s name by:
- Changing the View/Column settings in Outlook
- Changing the view in Outlook
- Run outlook in cleanview
- Run outlook in safe mode
- Repair Office
- Reinstall Office
Continue reading as we’re going to guide you through each and every step of the process. We recommend doing the steps in the order we’ve listed them – as the first ones are likely to fix the problem in an easy way.
How To Fix Outlook Inbox Not Showing Who E-mail Came From
Here’s a more thorough explanation of the methods we listed above. Hopefully, you won’t even have to go all the way through the steps before your view has been restored and you can continue using Outlook as normal again.
1. Change the View in Outlook
When you’re in your mailbox on the desktop client, you have access to a multitude of different options through the ribbon on the top of the screen. There’s also a menu on top, and that’s where we’re going to look.
Outlook comes with three different premade views, each view makes some adjustments to the layout of Outlook. This can, in some cases, include hiding or making the sender’s name and the email’s content less visible. Thankfully, you can restore your initial view with a few clicks!
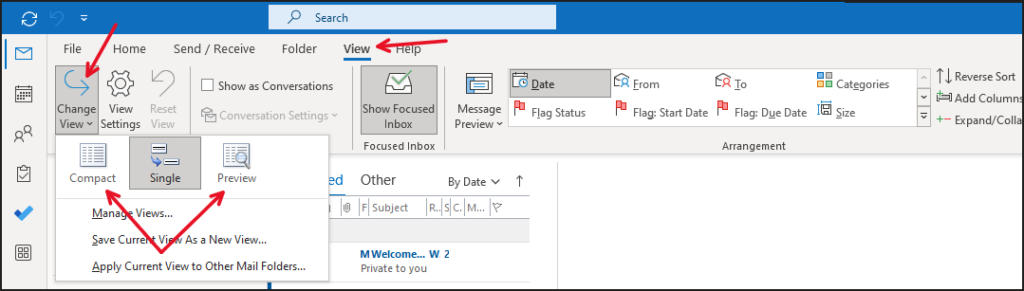
Step 1: Click the tab View, which you will find in the menu above the upper ribbon in Outlook.
Step 2: Click the button Change View
Step 3: Change your view to either Compact or Preview
2. Change View/Column settings in Outlook
With Outlook’s view and column settings, you can determine what you want and what you don’t want to display in your inbox. Think of your inbox as a column that includes data and each e-mail as a row. When we tell the column to not show a certain type of data, every row (e-mail) will hide it.
Who your e-mails came from is a type of data that can be hidden from the column. When people contact me about their inbox not showing sender names, this is usually the problem. Here’s how you can fix it.
Step 1: Click the tab View, which you will find in the menu above the upper ribbon in Outlook.
Step 2: Click View settings on the right side of the ribbon.

Step 3: Click the button Columns.
Step 4: Items displayed in the right box are displayed in Outlook while those in the left box are hidden. If you find the item From in the left box, select it and press Add.
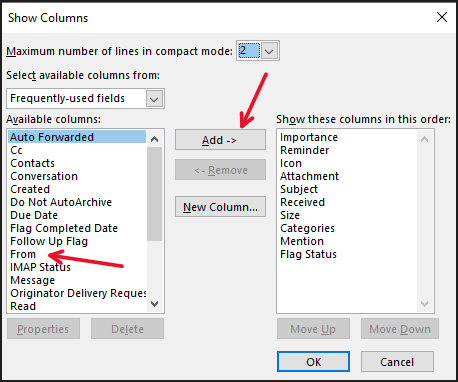
Step 5: If the item From is moved to the right-side box and placed at the end of the list, move it up the list so it’s among the top 5 items.
Step 6: Click Ok
Your inbox should now have the column From, which shows you who sent the e-mail. However, if the method described above wasn’t the fix to your problem, continue reading as we’ll continue troubleshooting.
3. Run Outlook in safe mode
Certain programs and operating systems can be run in something called safe mode. Running an application in safe mode opens a scaled-down basic version of the application designed to assist in troubleshooting.
Follow the steps below to start Outlook in safe mode.
Step 1: Right-click the start button in the lower-left corner and select Run
Step 2: In the Open field, type: Outlook.exe /safe
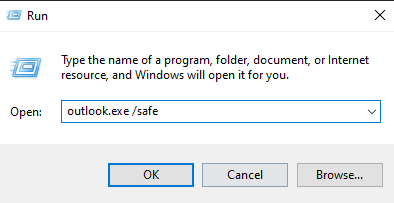
Step 3: Click Ok
Step 4: If you’re prompted to pick a profile, do so.
If Outlook displays the sender’s name when it is started in safe mode, then you assume that Outlook has run into problems when all settings, features, and addons are activated. Starting Outlook in safe mode can restore its original safe mode.
4. Run Outlook with cleanview
You can also start Outlook with another command called cleanview. The cleanview command will open Outlook with all the default views restored. All customizations that have been made to the layout by the user will be retracted.
Restoring the original view can aid in getting the From column, which shows the sender’s name in the inbox back. Remember, the cleanview command will open Outlook with none of the adjustments that you’ve made to the layout.
If you’ve made a lot of changes, you can expect things to look a bit different. Do the following to run Outlook with cleanview.
Step 1: Right-click the start button in the lower-left corner of Windows.
Step 2: Select Run
Step 3: In the field Open, type: Outlook.exe /cleanview
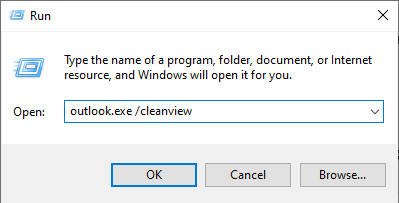
Step 4: Click Ok
5. Repair Office
You can repair your Office applications in the hopes that it restores the original view in Outlook. The repair tool can also be used to fix other problems with the Office suite. Once the tool is running it’ll try to identify the problem and repair it.
You can access and use the repair tool by doing the following.
Step 1: Search for Control Panel in the search bar in Window’s lower-left corner.
Step 2: Select Control Panel
Step 3: Go to Programs and Features
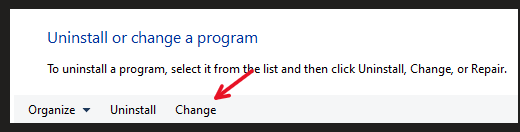
Step 4: Look for Microsoft365 Apps for Enterprise or any other version of Office. The item in the list should look something like the image below.

Step 5: Select Office/Microsoft 365 Apps in the list and click Change in the upper ribbon.
Step 6: If you’re prompted to allow the application to run then do so.
Step 7: In the window that appears, you can choose to do a Quick Repair or a more thorough Online Repair. Check the box of the repair you want to do and click Repair. If you choose to do the Quick Repair without avail, you could follow it up with an Online Repair to see if it fixes the issue.
6. Reinstall Office
Starting again with a clean slate will ensure your Outlook inbox has no more than the default settings, meaning no customizations have been made to the View Settings or any other settings for that matter. If everything else fails, reinstalling Office is most likely the thing that will restore your inbox.
You can uninstall Office from your control panel.
Step 1: Go to the Control Panel by searching for it in the search bar found in the lower-left corner.
Step 2: Select Programs and Features.
Step 3: Look for Office365/Office Apps/Outlook in the list of programs and features.
Step 4: Select the item you find and click the Uninstall button in the upper ribbon. Your application is now uninstalling.
Step 5: If you’ve got the installation files on your computer (Probably in your Downloads folder) you can run them from there. If not – go to www.office.com and log in. Once you’ve logged in you should see a button labeled “Install Office” in the upper-right corner. Click it.

Step 6: Once the installation files have been downloaded run them and go through the installation guide.
Step 7: Open Outlook and log in to your account to see if everything is back in order.