 If you’re tired of staring at a blank slide or just want to level up your presentations without spending hours designing, I’ve got you covered.
I’ve put together a collection of free PowerPoint templates that you can download and use right away – whether it’s for work, school, or a personal project. Clean, modern, and easy to customize – these templates are designed to save you time and help your slides stand out.
Check them out below and feel free to share with anyone who might find them useful!
#1 Business Presentation

Here’s a clean and modern business presentation template where each slide transitions downward with every click, thanks to the built-in Morph effect.
You can easily replace the placeholders with your own content, and everything is fully customizable to fit your needs. No extra animations—just smooth, seamless slide transitions that keep your presentation looking sharp and professional.
#2 Slide Carousell

 Interactive Slide Carousel PowerPoint Template – Free Download!
Looking for a more dynamic way to present your ideas? This free PowerPoint template features an interactive slide carousel effect that lets you navigate your presentation like a gallery.
Click the arrows to slide left or right through your content, and click directly on a slide to zoom in for a closer look.
Click again to smoothly zoom back out to the full gallery view. It’s a sleek, intuitive experience that keeps your audience engaged—and it’s fully customizable. Just download, drop in your content, and you’re ready to go!

#3 Sliding Bar Presentation

Looking for a simple way to level up your presentation game? This downloadable PowerPoint template comes with a smooth sliding bar menu that keeps your slides organized and easy to navigate — perfect for everything from school projects to business pitches.
 Download it in seconds
 Plug in your own text and topics
 Customize fonts, colors, images, and layout to match your style
No complicated setup, no design headaches. Just open the file, swap out the placeholders with your content, and you’re good to go. The layout is fully flexible, so whether you’re presenting data, telling a story, or showcasing a product — it’s got your back.
Perfect for: Business presentations
 Class projects
 Workshops and trainings
 Creative portfolios
Make it bold, clean, fun, professional — whatever fits your vibe. This template is all about making your message look great with minimal effort.
#4 Rotating Slide Presentation

 Rotating Slide PowerPoint Template – Smooth, Stylish, and Customizable!
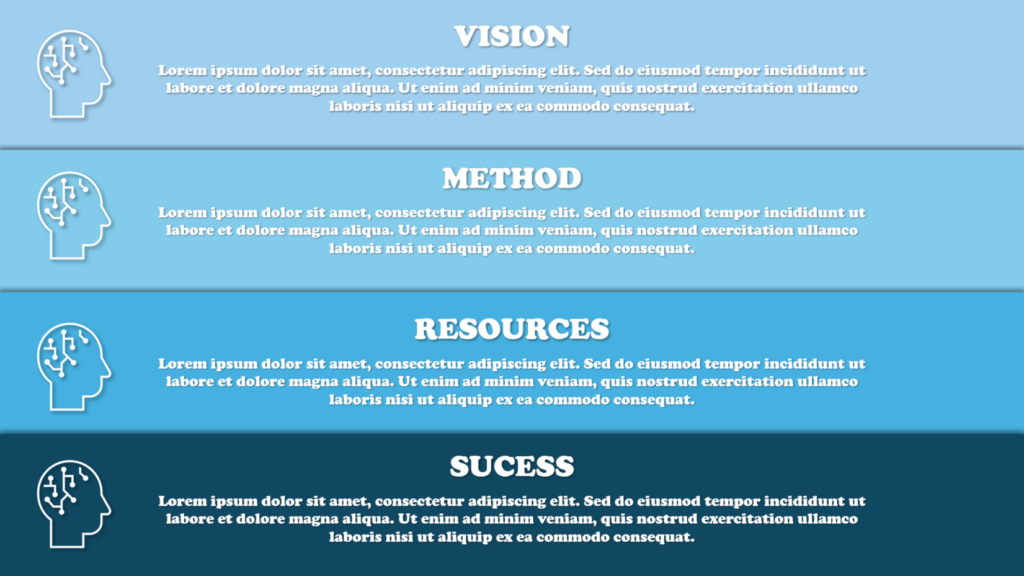
Spice up your presentations with this rotating slide PowerPoint template! It’s designed to add a little motion and a lot of style to your content, making your ideas pop and keeping your audience engaged from start to finish.
The template includes built-in rotating slide transitions for a modern, dynamic feel — perfect for portfolios, creative pitches, team updates, and more. Want to stand out without starting from scratch? This is for you.
 Heads up! The icons inside the white rectangle are already attached. If you want to add more icons, you’ll just need to create a new rectangle and drop in your own icons — super easy! If you need more slides, just copy one of the existing slides and change the background.
Great for: Presentations that need movement
 Portfolios and product showcases
 Idea sharing and storytelling
 School or work projects
Get creative, keep it smooth, and make your presentation one to remember!
]]>Throughout the last couple of years, a bunch of my clients have contacted me regarding an issue where they’re able to receive e-mails but can’t send any themselves. If you’ve had problems sending e-mails with Outlook, stay tuned as we’ll go through all the fixes we’ve tried that have worked.
Remember that the Outlook application is available both as a desktop and -web application. The desktop application is the one you’ve got installed on your computer, and the web app is the one you can access by visiting outlook.com or office.com.
Here’s what we’ve tried. I recommend going through the list from start to end. Clicking the links will take you to the section of the article where that specific solution is shown.
- Resend the message
- Check if offline mode is active
- Make sure you’re connected to the server
- Make sure your device has internet connection
- Test the Send All feature
- Restart Outlook
- Create a new mail profile
- Try disabling your VPN
- Increase server timeout load
- Try Outlook’s web application
- Update the application
I strongly suggest that you try one solution and then check if it worked before you proceed to do the next thing. It’s always best to do it one thing at a time, as you’ll have an easier time pinpointing what solved the problem.
1. Resend the message
Sometimes, an email might end up in the outbox folder as a draft after it’s sent. If that’s the case, simply go to the outbox folder and try resending the message. This simple fix will work fine if the issue was a one-time thing, but if the issue persists and Outlook doesn’t let you send new messages at all, then you’ll have to proceed down the list.
2. Check if offline mode is active
Outlook has a feature called offline mode. This feature will prevent you from receiving and sending e-mails, as Outlook is disconnected from the mail server. You’ll see if Offline mode is activated on the status bar at the bottom of the application window.
The reasons for the feature vary, but a common reason to use offline mode is to browse through your e-mail and calendar in Outlook when you’re nowhere near a network or have limited mobile data at your disposal. If the feature is activated, you’ll have a hard time sending emails as there’ll be no communication between Outlook and the mail server.
While users have stated that they’re able to receive e-mails, it’s still worth checking if offline mode is the culprit.
Step 1: Open Outlook
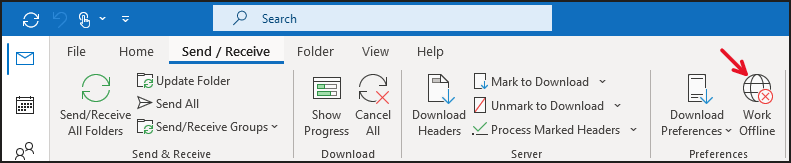
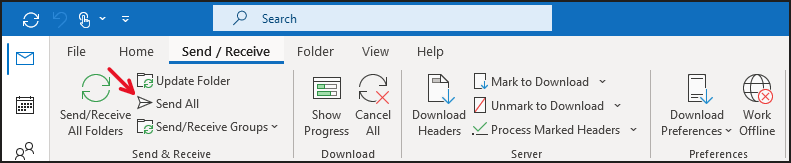
Step 2: Go to the Send / Receive tab
Step 3: Check if Work Offline is selected. Uncheck it if needed then restart Outlook.
3. Make sure you’re connected to the server
If you aren’t connected to the server, then you won’t be able to communicate your outgoing and ingoing data. This will make it difficult (if not impossible) for you to send and receive e-mails. To ensure that you’re connected to the server, do the following.
Step 1: Look for the Outlook icon in the system tray down in the lower-right corner of the screen. If it isn’t visible at first sight, look for the upward-pointing arrow and press that to expose it.
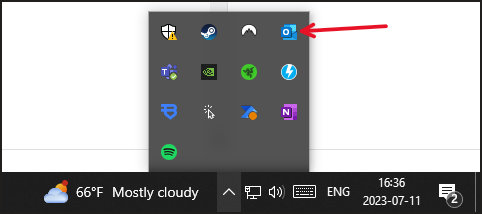
Step 2: Hold down the CTRL-key and right-click the Outlook icon.
Step 3: Select Connection Status
Step 4: Now you’ll see a list of SMPT addresses. Scroll to the right to see if their connection status is set to established.
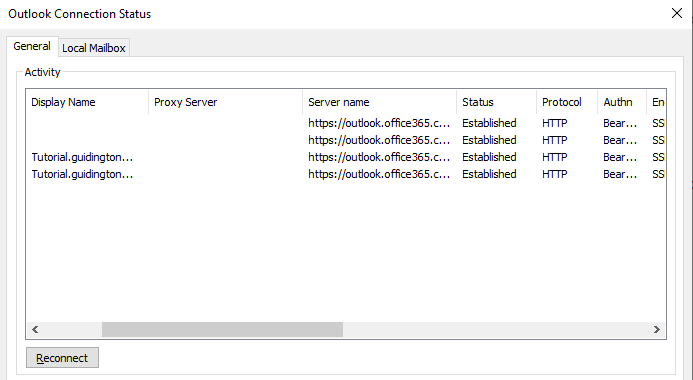
Step 5: If the connection isn’t established, press Reconnect in the lower-left corner of the window.
4. Make sure your device has a stable internet connection
While you shouldn’t be able to receive e-mails when your device isn’t connected to the internet, you might have cached e-mails or e-mails that you’ve already received but haven’t read yet. Therefore, checking that your internet connection is stable and working as intended is recommended.
Try visiting a website or using any other network-dependent service to see if the internet connection is working.
5. Test the Send All feature
Outlook has a feature that sends all unsent e-mails that the mail server was unable to send the last time it tried. The send all feature can be accessed via Outlook’s desktop application and could perhaps prove useful when having problems sending e-mails.
Step 1: Open Outlook
Step 2: Go to the Send / Receive tab
Step 3: Click Send All
6. Restart Outlook
If you haven’t already restarted the application, that’s worth doing as it might fix the problem. Sometimes, an application will be stuck or unable to contact the server until the process is shut down and restarted. Simply close down Outlook and start it back up again. See if the issue persists.
7. Create a new mail profile
Creating a new mail profile can solve a bunch of different temporary glitches in Outlook. It has been used by users all over the world to overcome minor and major bugs in the application. I don’t recommend removing your old profile, instead, I’d suggest that you create a new profile and save the old one just in case.
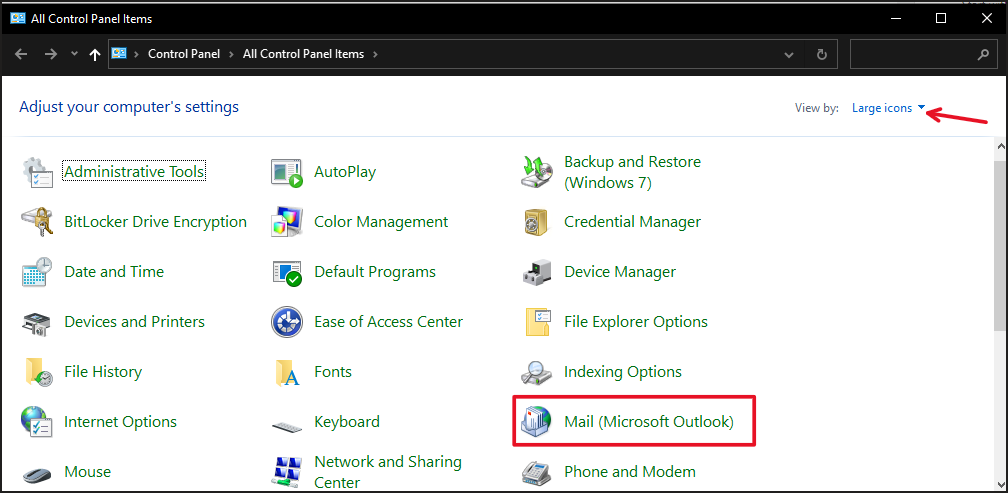
Step 1: Close Outlook then open the Control Panel by searching for it in Window’s search bar.
Step 2: Look for the Mail icon in the control panel. If your view doesn’t look like mine, make sure your view is set to “Large Icons”.
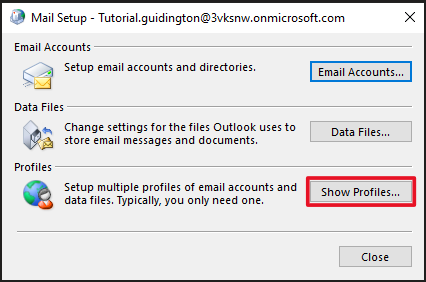
Step 3: Click Show Profiles
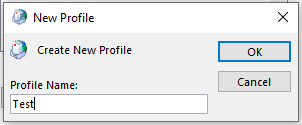
Step 4: Press Add
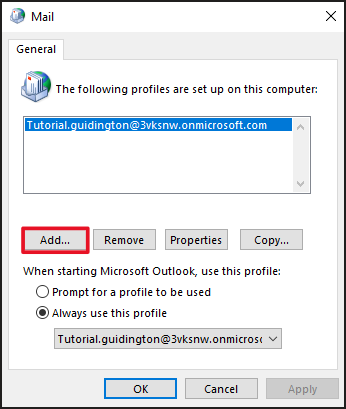
Step 4: Name the profile
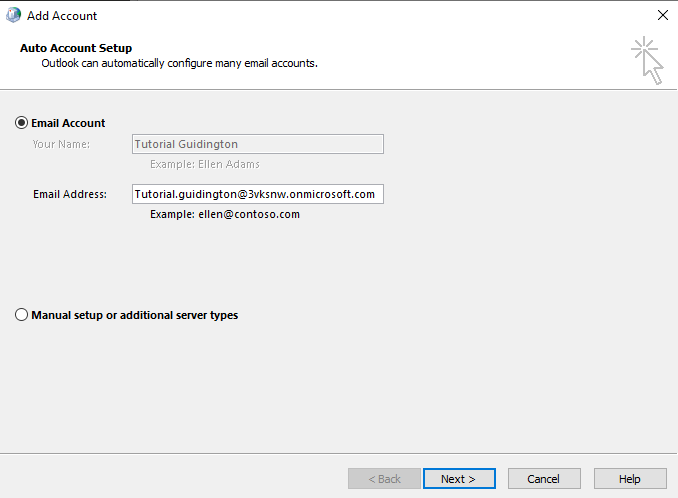
Step 5: Provide your e-mail address when prompted then click Next.
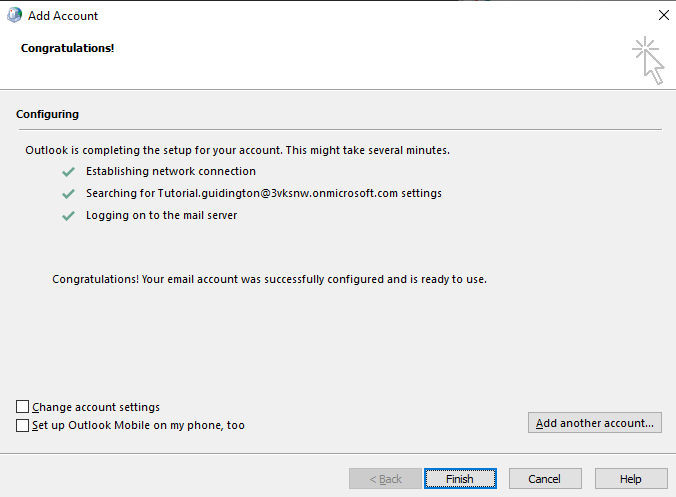
Step 6: Click Finish.
Step 7: Select the new profile in the upper window then change the profile set under Always use this profile to the new one.
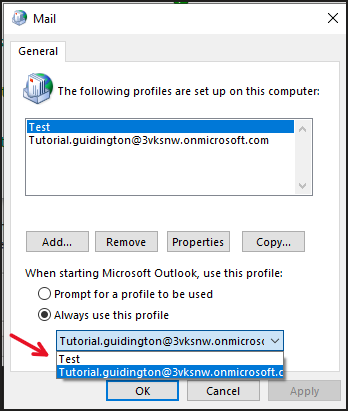
Step 8: Click Apply then Ok.
Step 9: Start Outlook and input your e-mail and password if prompted.
8. Try disabling your VPN
If you’re using a VPN, or virtual private network, to protect yourself when working, the VPN might throw a spanner in the works for you, as it can sometimes hinder other apps from working as intended. This can include Outlook among other applications.
Checking if this is what’s causing Outlook to not send e-mails is done in a matter of seconds. Simply disable your VPN connection and then restart Outlook. If the issue was caused by the VPN, it should be resolved by now.
It might also be worth restarting the computer after disconnecting from the VPN.
9. Increase server timeout load
By default, Outlook’s timeout settings are quite low, approximately 1 minute. When the server timeout settings are too low, the application will start acting up. This includes not being able to send/receive e-mails, sending duplicate e-mails, etc. It might be because there’s a large mailbox or list of files and folders that takes longer to sync than the timeout settings allow.
Increasing the timeout settings can prevent this type of behavior. Here’s how to do it.
Step 1: Click File in the upper-left corner.

Step 2: Click Account Settings to open a dropdown menu. Then click Account Settings in the dropdown menu as well.
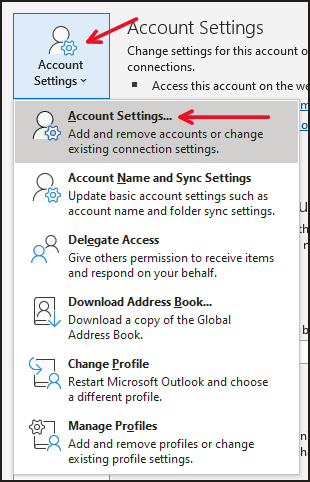
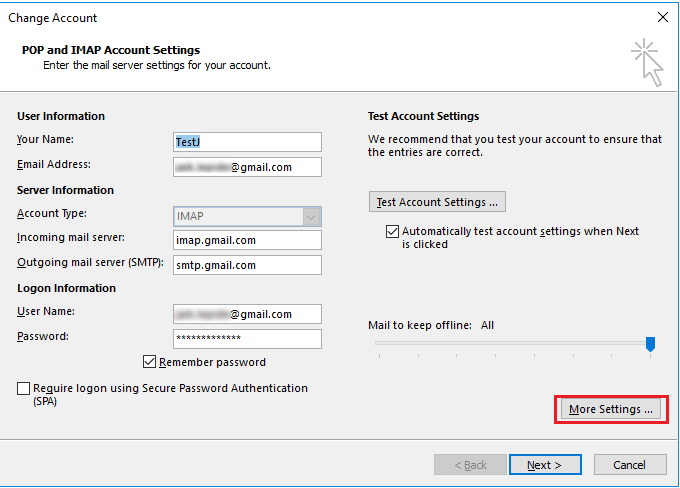
Step 3: Select the profile in the list. With the profile selected, click the Change Account button.

Step 4: Click More Settings in the lower-right corner.
Step 5: Under the Advanced tab, slide the Server Timeouts from short to long.
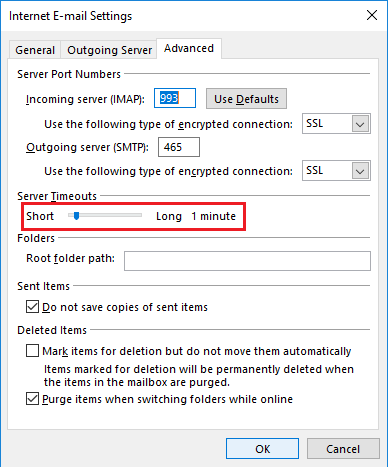
Step 6: Press Ok.
10. Try Outlook’s web application
If you’re a frequent user of Outlook’s desktop application, then you might not like the idea of changing over to the web application. Well, they’re updating the desktop application to look more and more like the web application. Regardless, you’re not doomed to use the web application for the rest of your life.
Instead, try accessing Outlook’s web application to see if the issue also happens when you try to send e-mails from there. This should indicate that there’s something greater going on. You can access the web application by going to www.office.com and signing in with your account.
11. Update the application
Ensuring you have the most recent update isn’t a surefire way to stay out of trouble, as some new updates actually bring more problems than they fix. But if you’re experiencing problems with the application, I suggest that you look if there’s an update pending.
Step 1: Click File in the upper-left corner.

Step 2: Go to Office Account in the lower-left corner.
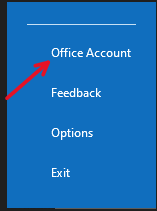
Step 3: Click Update Options on the right-hand side then Update Now.
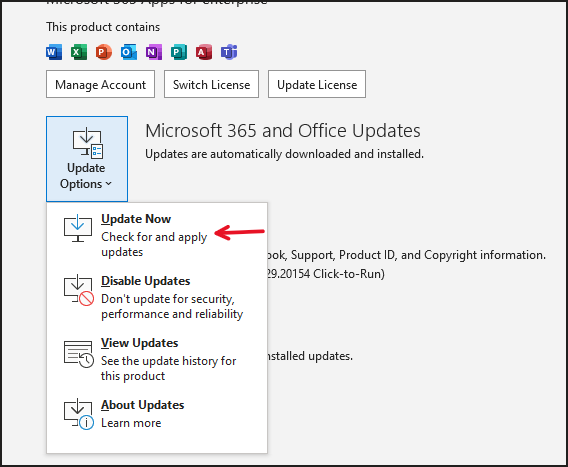
Follow the prompts that follow and let the application update if an update is found.
]]>When a client of mine recently contacted me about moving a list from one team to another I said that I could fix it immediately, but as I started I found out it wasn’t as straightforward as I had initially thought.
In this article, we’ll show you how you can move a list from one team to another without getting rid of the content of the list. You can move lists freely between channels because the lists are linked to the Team and only displayed through the channels – but it’s different when moving between actual teams.
1. Import the List to Excel Then Create List From Excel Sheet
Microsoft Lists come with an export feature, which will export the data in your list to an Excel sheet or CSV file, depending on what you choose. The exported data can then be used to create a new list and populate it with the data from the old list.
This method requires a bit of manual input if you have a lot of custom-made columns in your list. As you might know, columns in Lists / SharePoint come with different functions, such as “people”, “choices”, “numbers”, etc. These functions dictate what type of data you can store within that specific column.
Excel does not have the same functions by default, which means the functions (column types) will be dropped from the columns when exported to Excel. The column types must then be reapplied manually in the new list. The data will be there, but the column might not display it correctly at first.
Without further ado, here are the steps to do it.
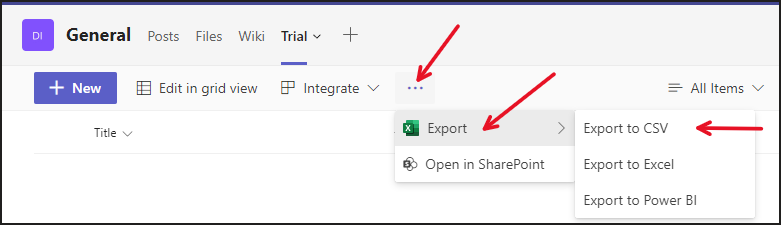
Step 1: Open the list in Teams/SharePoint or the Lists app.
Step 2: Press the three dots (If Export isn’t visible) then press Export and select to CSV.
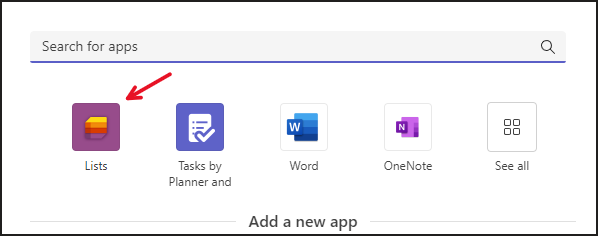
Step 3: Go to the other Team and select the channel where you want to display the list. Press the + sign in the upper panel of that channel.

Step 4: Select Lists.
Step 5: Click Save.
Step 6: Select Create a List.
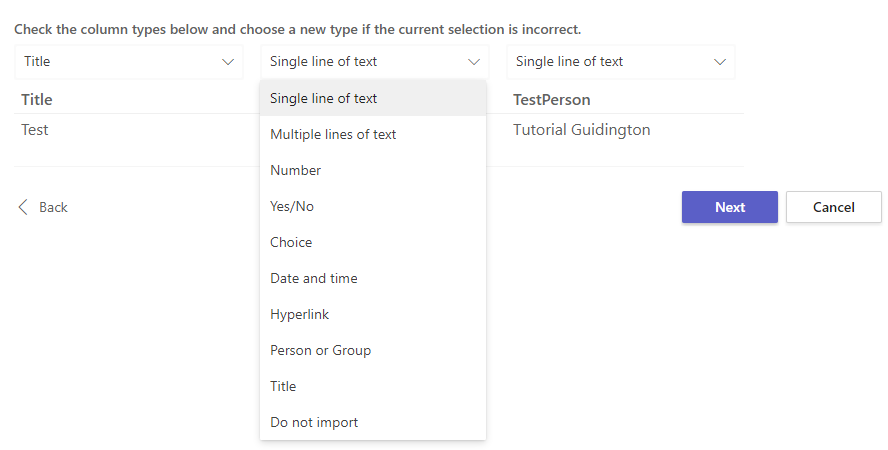
Step 7: Select from CSV.
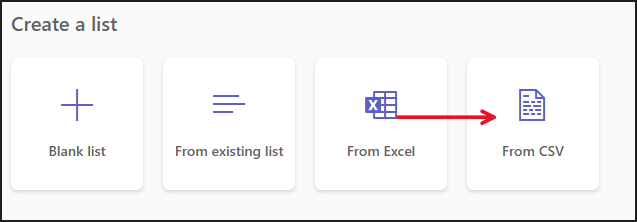
Step 8: Upload the file you exported earlier.
Step 9: Manually set the column types for each column.
Step 10: Wait for the list to be created.
Now we need to fine-tune the list. Column types such as choices or persons must be adjusted one more time to make sure the data the row is populated with can retrieve settings such as information about the person or color of the choice, etc.
Now, the field contains information but it’s just plain text with no function connected to it.
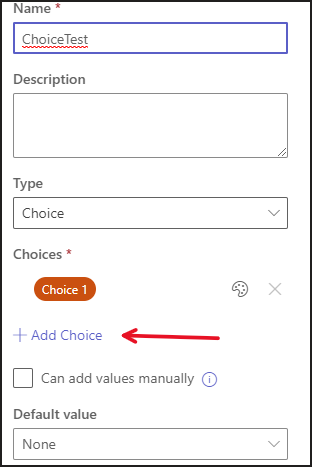
Step 11: Click the column then go to Column settings and select Edit.

Step 12: For choice columns, click Add choice to populate the column with choices.
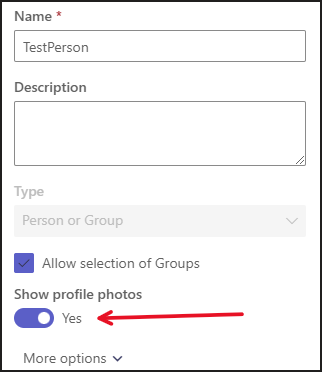
Step 13: If you’ve got a “Person or Groups” column that isn’t showing information about the person when you hover over it, you need to activate the column. I’ve found that editing the column and changing the Show profile photos setting then saving does the trick.
The name in the field should now be connected to a person. You might need to click out of the list and then re-open it.
Continue making the manual adjustments needed, if any. Now the list is located in the proper Team but make sure to keep the other list in the past Team until the new list is configured fully as you’ll want to backtrack to the other list to check how it was configured.
Once all changes are made, you can remove the old list without altering the new one.
Bonus:
These lists don’t sync with one another. Meaning, if changes are made in one of the lists, the changes won’t appear in the other one. Therefore, it might be wise to restrict colleagues from working on the old list if you’ve decided to keep it. This can be done by managing access to the file from within lists.
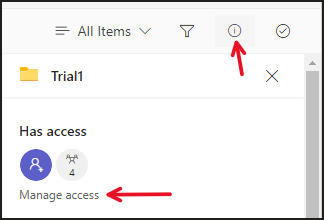
Then set Members’ and Visitors’ access to Can View.
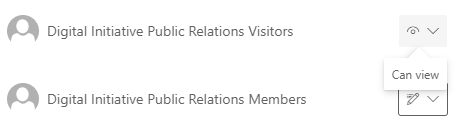
Group members and guests can’t edit the list now. This can be nice to have while you’re setting up the new list to make sure no information is added to the old list.
2. Create a List From an Existing One Then Move the Data Manually
You can create a list from an existing one, which will give you a brand new list using the same structure and formatting as the list you referenced during the creation stage. There will be no data in the list, but the data can be copied over.
Step 1: Go to the channel where you want to open the list.
Step 2: Click the plus sign in the panel.
Step 3: Select Lists.
Step 4: Click save if prompted to do so. Then select Create a list.
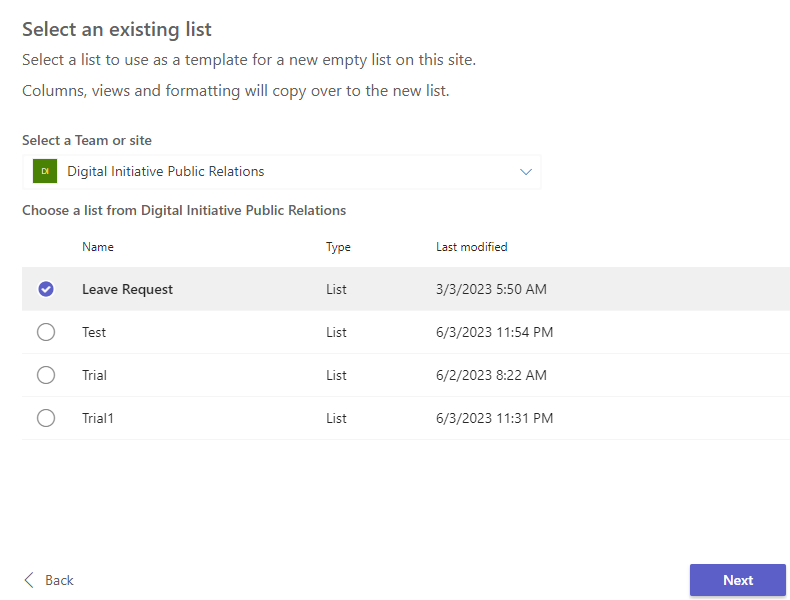
Step 5: Pick From existing list.
Step 6: Select the team where the list is stored, then pick the list you want to reference. Click Save.
Now it’s time to move the data from one list to the next.
Step 7: Open up the old list and click Edit in grid view. Select all entries by pressing the circle in the upper-left corner under the New button.
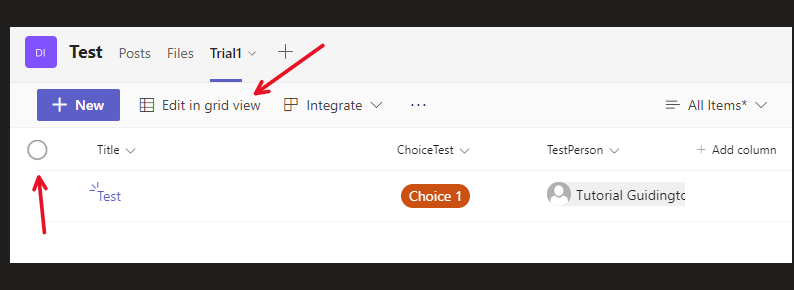
Step 8: Once they’re selected, press Ctrl + C to copy the data.
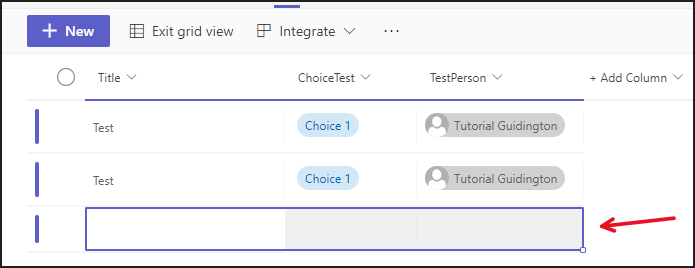
Step 9: Open up the new list and click Edit in grid view.
Step 10: Select the bottom row then press Ctrl + V to paste the data. Additional rows containing the copied data will now be added to the list.
Step 11: Make adjustments to the columns if needed. Otherwise, you’re done!
3. Create a Link To the List In Teams
Alternatively, you could create a link to the list and place it in the new team. This will display the list in the new team – but it will still be stored in the old team, which will be the owner of the list.
Step 1: Go to the new team and open up a channel.
Step 2: Click the plus sign.

Step 3: Select Lists.

Step 4: Click Save if prompted to do so then choose to add an already existing list.

Step 5: Go to Office.com and open the Lists app. From there, open the list you want to link and copy the URL.
Step 6: Insert the link in the field then press the arrow.

Step 7: The new team will now have access to the list. Now both teams can make changes to the lists and they will be synchronized. However, if you were to remove the list from its original location, or if the team is removed, the list will also be removed from the new team as the link will work no more.
Make a Template of the List
You can also make list templates and then use those templates to create new lists in other teams. This is a way of moving a list from one team to another.
The only downside is that the actual content of the list isn’t included in the template, only the formatting, structure, colors, and columns. You will then have to move the information from one list to the subsequent one.
However, there are rather simple ways of transferring the information between the lists once the templates have been set up. You can use either the method shown in the step prior to this one or by creating simple Power Automate flows.
Not all tenants and SharePoint sites/Teams have templates activated. In that case, the function must be activated with PowerShell. Otherwise, you should be able to find the Save as a template function by going to list settings, which can be accessed by pressing the cog in the upper-right corner, next to your initials, in the list.
I do recommend one of the other methods we’ve discussed thus far unless you plan to use the list for multiple Teams. In that case, making a template might be useful. Regardless, I think you’ll achieve the results you’re after by creating lists based on the structure of another list.
]]>Sometimes, this function will run into problems. Lately, I’ve been contacted by clients whose video option is greyed out when they are in teams meetings. This renders their camera useless, as they can’t activate the function in Teams. In this article, we’re going to take a look at what you can do to fix this issue.
Try these fixes:
- Reconnect the Camera
- Set the Right Camera in Teams
- Allow Camera Access In Your Browser
- Allow Teams To Use Your Camera
- Enable the Camera On Your Device
- Update or Reinstall the Camera Drivers
- Close Other Applications
- Verify the Camera
- Clear the Teams Cache
- Allow Video Calls In Your Tenant (Admin)
- Update Microsoft Teams
- Reinstall Microsoft Teams
- Register the Camera Using PowerShell
The links will take you to the section of the article where we describe how to apply the fix in greater detail. I recommend starting from the top and scrolling down the list, trying one fix at a time then verifying if it fixed your issue.
1. Reconnect the Camera
For those using an external camera, unplugging the camera can fix the issue. You should also make sure to try another USB port, as the current one might be malfunctioning, which prevents the computer from registering the camera.
Do this:
Step 1: Close Teams (Make sure to shut down the application completely).
Step 2: Unplug the camera and reconnect it.
Step 3: Launch Teams again.
Step 4: Join a call to see if the camera can be displayed.
2. Set the Right Camera in Teams
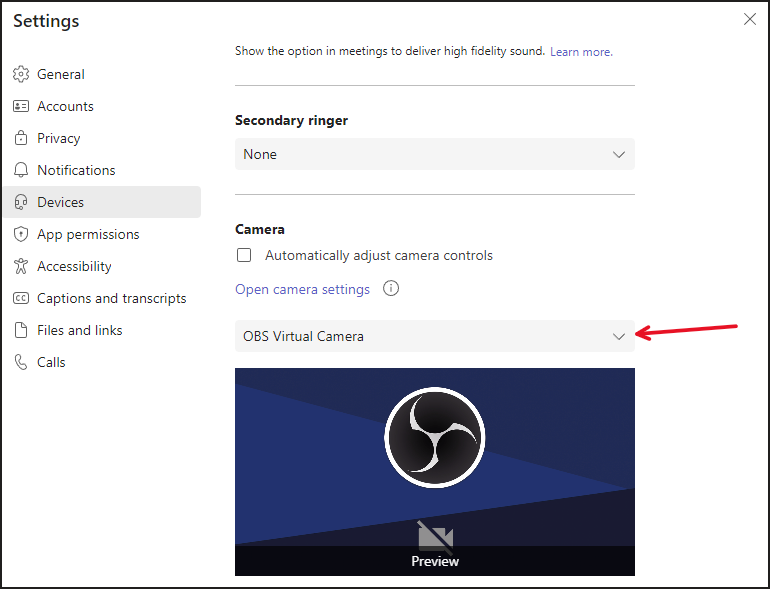
The wrong camera might be set in Teams, and this can happen without you changing anything manually. For instance, I’m running OBS, which is a tool for me to record my screen and stream, and Teams has set that as my camera, for no obvious reason. As long as OBS is set as my camera, I can’t display video in calls.
Here’s how to check if you’ve got the proper camera set as your default camera in Teams.
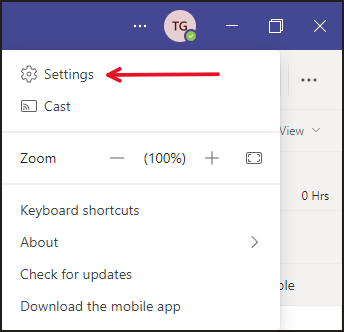
Step 1: Click the three dots in the upper-right corner next to your initials in Teams.

Step 2: Click Settings.
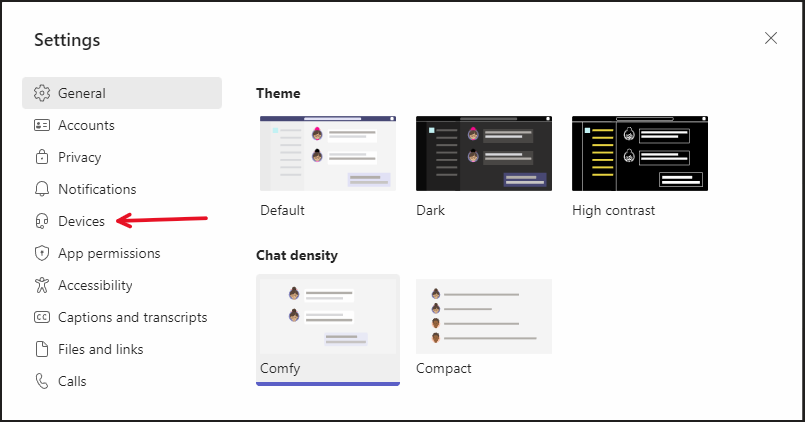
Step 3: Click Devices.
Step 4: Scroll down to Camera and make sure the correct camera is set as your default camera in Teams.
3. Allow Camera Access In Your Browser
If you’re accessing Teams via Chrome, Edge, or any other browser, you need to allow the browser you access your camera. Otherwise, you won’t be able to display video in your Teams meetings.
Here’s how to do it in Chrome.
Step 1: Click the three dots in the upper-right corner then select Settings.
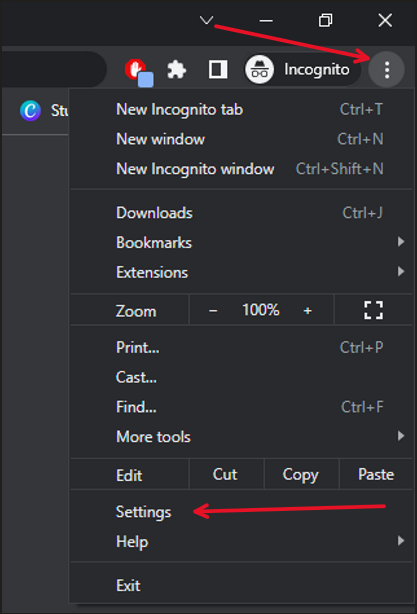
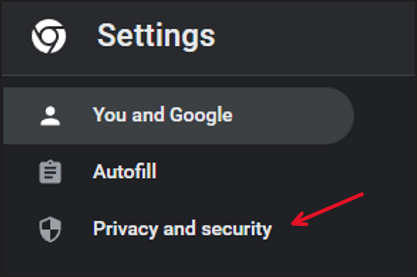
Step 2: Go to Privacy and Security.
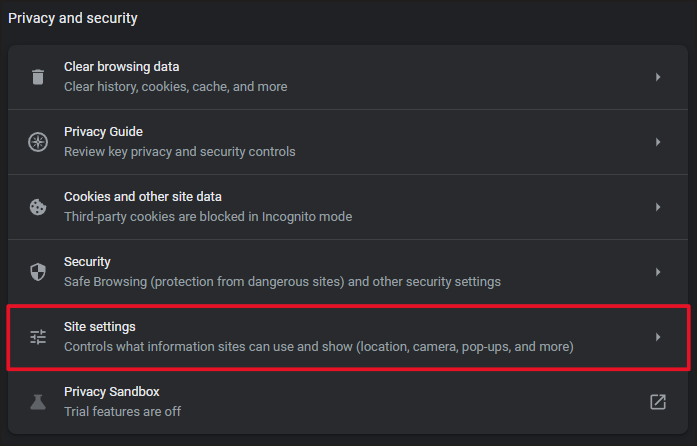
Step 3: Go to Site Settings.
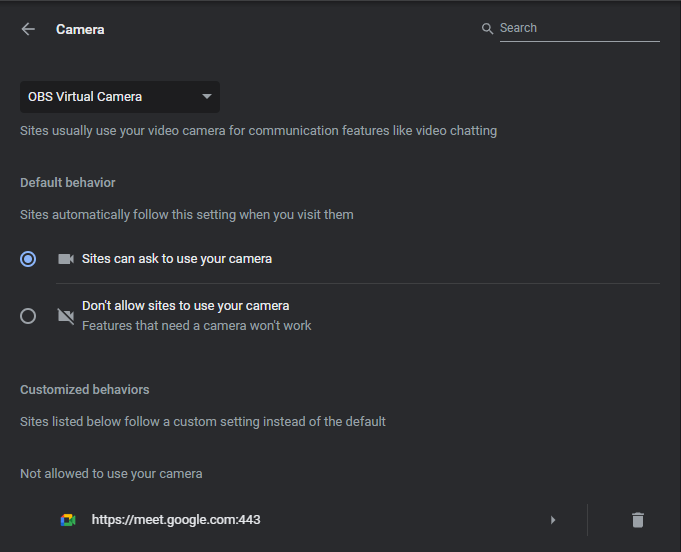
Step 4: Scroll down & select Camera.

Step 5: Set the right Camera.
Step 6: Set the default behavior (Allow sites to ask for permission)
Step 7: Make sure Teams isn’t on the list of blocked websites.
4. Allow Teams To Use Your Camera
In order to display video in Teams, you need to allow the application to use your camera. This can be done from within Windows. Even if your computer has allowed Teams to use the camera in the past, an update might’ve changed that, so it’s always worth checking. Here’s how.
Step 1: Right-click the start menu in Windows and select settings.
Step 2: Go to Privacy.
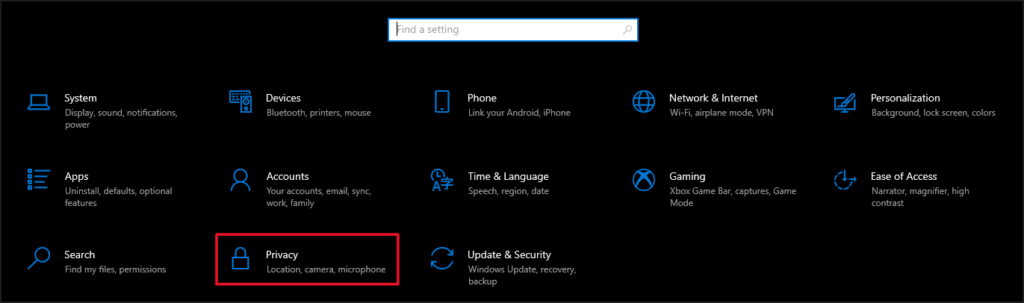
Step 3: Go to Camera on the left-hand side.
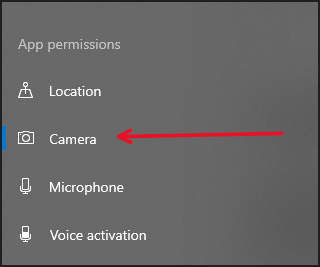
Step 4: Make sure Allow access to the camera on this device and Allow apps to access your camera are turned on.
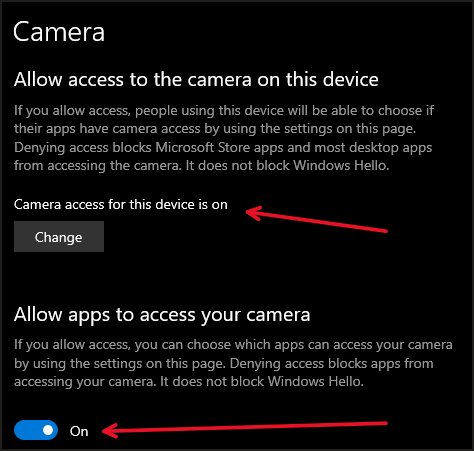
Step 5: Scroll to the bottom of the page and check if Allow desktop apps to access your camera is on.
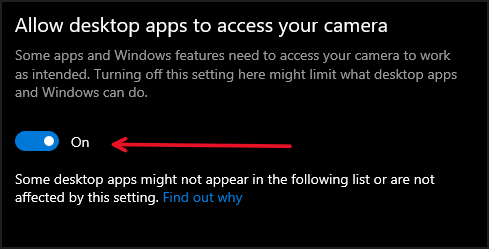
Step 6: If Microsoft Teams is listed among the apps in the Choose which Microsoft Store apps can access your camera, make sure it’s turned on.
5. Enable the Camera On Your Device
Your camera might be disabled, preventing you from using it in Teams. The camera might’ve been disabled by accident or as a result of an update. It’s hard to tell what could’ve disabled it. Regardless, enabling it shouldn’t be a difficult task.
Start by checking if your computer has an on/off button for the camera. This might be a button or a slide/switch located on the side of your computer. Otherwise, enable the device from the Device Manager.
Step 1: Right-click the Windows start menu.
Step 2: Select Device Manager
Step 3: Look for Camera in the list of devices then expand the Camera item.
Step 4: Your camera(s) should be showing here. Right-click the camera you want to use and select Enable Device.
6. Update or Reinstall the Camera Drivers
Hardware drivers tend to fix problems, so they’re always worth looking for when you’re running into problems with a certain component in your computer. This time, we’ll be looking at updating or reinstalling your camera drivers, as this has proved to fix the issue for many users we’ve helped.
Before we begin: Write down the name of your camera or computer model. If you have a computer with an internal camera (laptop, most likely) then write down the computer model. If the camera is external, write down the name of the camera – both brand and model.
Step 1: Right-click the Windows start menu.
Step 2: Select Device Manager.
Step 3: Look for Cameras in the list of devices then expand the option by pressing the arrow on the left-hand side.
Step 4: Your camera(s) should be showing here. Right-click the camera you intend to use and select Uninstall Device.
Step 5: Go to the manufacturer’s website and download the most recent drivers for your product.
Step 6: Install the files that you downloaded.
Step 7: Restart the computer if prompted to.
Step 8: Try your camera in Teams.
7. Close Other Applications
If your camera option stays greyed out after all these changes, then it’s time to close other applications running both in the fore and background as they may interfere with both the camera and Teams itself. Start closing applications that might cause interference and check Teams while doing it.
You might need to restart Teams for the camera option to be viable again. Close a couple of apps then start Teams. If that didn’t do the trick, close Teams and continue closing apps then start it back up again.
If you find the app that might be causing the problem, make sure to take note of which app it is. You can even shut down autostart for that specific app so that it doesn’t launch automatically when your computer is started.
8. Verify That the Camera Works
It might turn out that Teams isn’t the problem, but the camera itself. Teams could be restricted from using the camera because the device is defective. Thankfully, there are simple to tell if the problem is bound to Teams or if the camera can’t be detected elsewhere in Windows. For this, we’ll be using the camera app.
Step 1: Search for the Camera app using the Windows search bar.
Step 2: Verify that the camera can display video. Is the display black? Is no camera detected?
If so, your camera might be running into bigger problems than just Teams.
9. Clear the Teams Cache
Your Teams cache, which stores a bunch of byproducts of your Teams usage, can sometimes cause discrepancies in the application. Deleting the cache’s contents is a go-to fix for several problems in Teams.
Once emptied, the cache will start populating with new files once the application is started and used again.
Step 1: Browse to the cache’s default location (C:\Users\<your_windows_username>\appData\Roaming\Microsoft\Teams.) in File Explorer.
Step 2: If you can’t find the AppData folder – click the View tab in File Explorer and check the “Hidden Items” box then continue browsing the search path above all the way to the Teams folder.

Step 3: Once you’ve found the Teams folder, right-click it and select Delete.
Step 4: When prompted if you want to delete the folder, click Yes.
Step 5: Search for Teams using the Windows search bar and start the application.
10. Allow Video Calls In Your Tenant (Admin)
If you’re an admin or have one at your disposal. Make sure video calls haven’t been disabled from the Meeting Policy in your tenant’s Teams administration center.
Access the administration center by going to Office.com and signing in. You must be signed into an account with admin rights in order to see the administration center once logged in.
Step 1: Open up the admin center.
Step 2: Click Show All at the bottom of the list on the left-hand side.
Step 3: Go to Teams Administration Center.
Step 4: Go to Meetings.
Step 5: Go to Meeting Policies.
Step 6: Open Org-Wide Global Policies.
Step 7: Scroll down to the Audio / Video section and make sure video is enabled.
11. Update Microsoft Teams
Ensuring that you have updated the software to the most recent version can also fix the problem. You can update the application from within Teams by doing the following.
Step 1: Open up the desktop application
Step 2: Click the three dots in the upper-right corner next to your initials.
Step 3: Click Check for updates. Teams will look for the latest software updates and update the application automatically.
Step 4: Restart the application if you’re prompted to do so.
12. Reinstall Microsoft Teams
If none of the methods above have solved the problem, your next best bet is to reinstall the application on your computer. Reinstalling the app should ensure that any corrupt or damaged files are restored. Thankfully, reinstalling Teams is an easy task.
Here’s how to do it.
Step 1: Open the control panel by searching for the control panel using the Windows search bar.
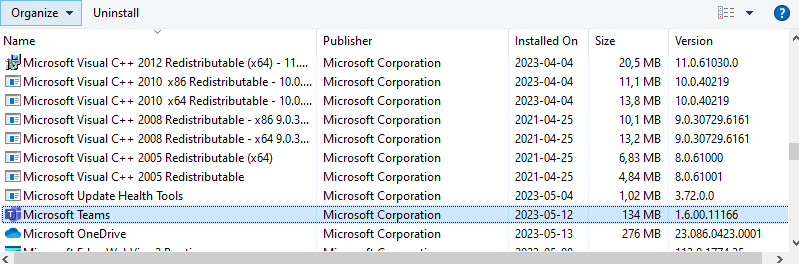
Step 2: Select Programs and Features.
Step 3: Select Microsoft Teams in the list and click Uninstall.
Step 4: Download Teams from Microsoft (Link to Microsoft.com).

Step 5: Choose between the options below.

Step 6: Launch the installation file that was downloaded.
Step 7: Once installed, sign in to your account.
13. Register the Camera Using PowerShell
You can re-register your camera as a Windows device using PowerShell in Windows. This could be what’s causing the problem. You’ll have to run PowerShell commands to fix this issue, but they’re not complicated at all.
Step 1: Right-click the Windows start menu.
Step 2: Select Windows PowerShell (Admin)
Step 3: Once PowerShell has opened. Copy and paste the following code into your PowerShell window then press Enter.
Get-AppxPackage -allusers Microsoft.WindowsCamera | Foreach {Add-AppxPackage -DisableDevelopmentMode -Register “$($_.InstallLocation)\AppXManifest.xml”}
Step 4: Close PowerShell and check if the camera is working as intended now.
]]>Yesterday, I had a conversation with a client in Microsoft Teams. The client shared details about an upcoming webinar that I was to attend. This morning I opened up our conversation on the same computer, using the same client, and our previous chats were missing.
I couldn’t find the information anywhere in Teams, so I started troubleshooting the error. As it turns out, I wasn’t the only one who has run into this problem. Therefore, I decided to create a guide for others who might experience the same issue.
Troubleshooting Disappearing Microsoft Teams Chats
Down below is a list of different techniques that will (hopefully) fix your problem.
1. Search For Hidden Chats
One possible reason why your chats may have disappeared could be because you’ve hidden the conversation accidentally. This is only true if you’re missing the entire conversation (including their name in your chat list), not just specific messages.
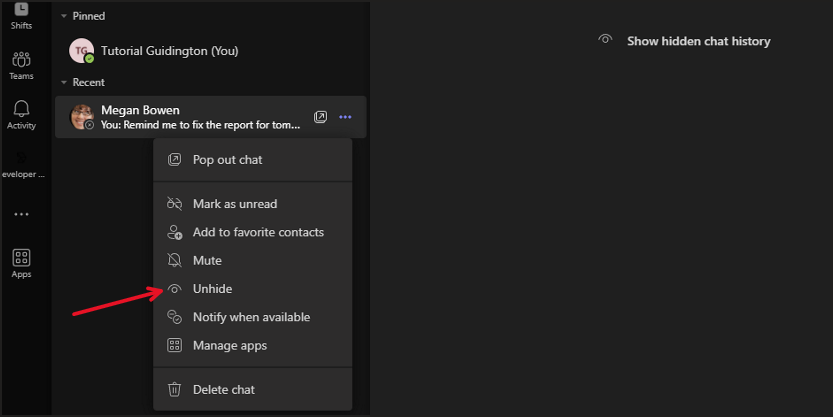
Below is an image showing that I haven’t chatted with anyone, which isn’t true. It’s because I accidentally hid the conversation between me and Megan, who I spoke to recently. Now, let’s restore the messages so they’re visible in the chat pane once again.

To unhide hidden chats, do the following:
1. Search for the person who you communicated with using the upper middle search bar in Microsoft Teams.
2. Open your chat with the person by clicking on their name. The chat should reappear under Recent on the left-hand side.

3. Right-click the person or click the three dots then select Unhide.
4. The conversation should now be pinned to the chat window and the messages should be restored. Neither the contact nor the messages should disappear unless they’re hidden again.
This is the most probable cause of the missing messages, but if the messages can’t be restored this way, continue to the next step.
2. Open Teams In Browser
There are two types of Teams clients – ways of accessing teams. The desktop application is the one that’s installed on your computer and that’s launched when the computer is turned on. The other is the web application, which you can find by opening a web browser and visiting Office.com.
1. Go to www.office.com and sign in.
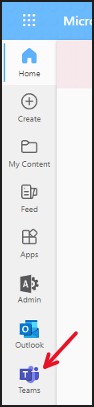
2. Click the Teams icon on the left-hand side.
3. If you’re given the option to open the web or desktop application, open Teams in the web application.
Sometimes, the desktop client will have a hard time synchronizing data, this can cause discrepancies such as the one discussed in this article. If the messages can be found in the web application, then there’s something wrong with the desktop application.
But for now, your messages are accessible on the web. To fix the desktop application, continue with the next step.
3. Clear Microsoft Teams Cache
Your Teams cache, which stores a bunch of byproducts of your Teams usage, can sometimes cause discrepancies in the application. Deleting the cache’s contents is a go-to fix for several problems in Teams.
Once emptied, the cache will start populating with new files once the application is started and used again.
1. Browse to the cache’s default location (C:\Users\<your_windows_username>\appData\Roaming\Microsoft\Teams.) in File Explorer.
2. If you can’t find the AppData folder – click the View tab in File Explorer and check the “Hidden Items” box then continue browsing the search path above all the way to the Teams folder.
3. Once you’ve found the Teams folder, right-click it and select Delete.
4. When prompted if you want to delete the folder, click Yes.
5. Search for Teams using the Windows search bar and start the application.
4. Restart Teams
Have you tried restarting the application? Sometimes, doing so will fix both minor and major problems with the application.
1. Look for the Teams icon in the lower-right corner of the screen. If the Teams icon isn’t visible, look for an upward-pointing arrow. Click it to find the Teams icon.
2. Right-click the Teams icon on the activity bar.
2. Select Quit Teams
4. Search for Microsoft Teams using the Windows search bar.
5. Open the application and search for the person whose messages are missing.
5. Sign Out of Teams
Another simple technique that you should try before looking at the more time-consuming methods (that aren’t THAT time-consuming) is to simply sign out of the application and then sign back in. This has proved to fix the issue according to Microsoft themselves.
6. Update Teams
Ensuring that you have updated the software to the most recent version can also fix the problem. You can update the application from within Teams by doing the following.
1. Open up the desktop application
2. Click the three dots in the upper-right corner next to your initials.
3. Click Check for updates. Teams will look for the latest software updates and update the application automatically.
4. Restart the application if you’re prompted to do so.
7. Restart Your Computer
If none of the methods above have proved fruitful, try restarting your device to see if that fixes the issue. Don’t just turn off the computer and start it up again, make sure to hit Restart. This will kickstart any updates on standby.
8. Reinstall Teams
If you still haven’t found the missing messages on the desktop application you might need to reinstall the application to retrieve them.
1. Open the control panel by searching for the control panel using the Windows search bar.
2. Select Programs and Features.
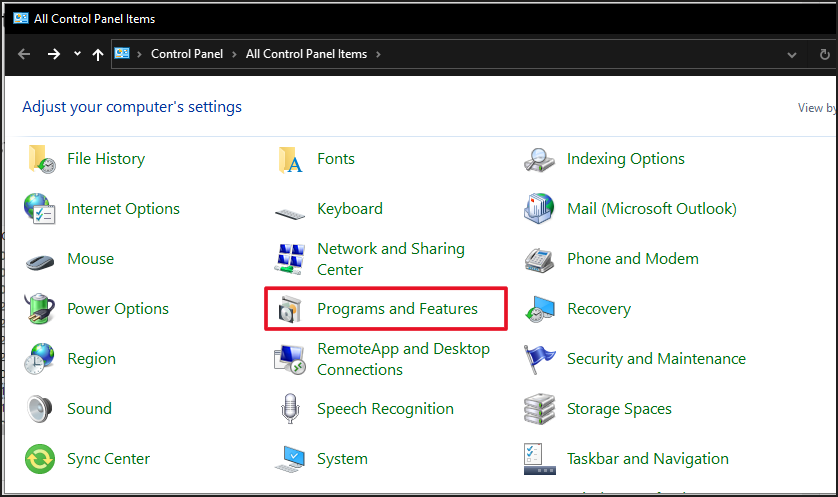
3. Select Microsoft Teams in the list and click Uninstall.
4. Download Teams from Microsoft (Link to Microsoft.com).
5. Choose between the options below.
6. Launch the installation file that was downloaded.
7. Once installed, sign in to your account.
8. Check to see if you can find the messages.
Conclusion
If none of the methods have worked for you, try going back to the first method now that you’ve reinstalled the application and updated it. If you somehow found another way of fixing the problem, feel free to comment what you did down below so we can add the solution to the list and help others.
]]>
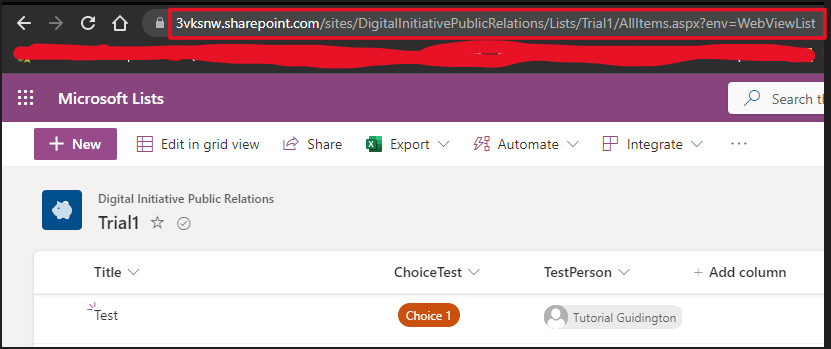
In this article, we’ll go through what’s causing this and what you can do to reverse the problem so you can synchronize the shared library successfully. We’ll also show you how to find the shortcut if you’re having trouble doing so.
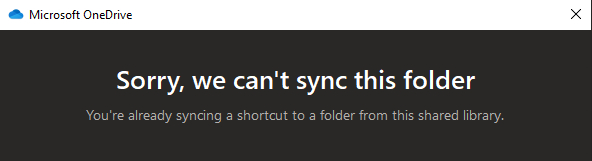
You want to synchronize the shared file library to your File Explorer, but there’s already a shortcut from that file library in your OneDrive. The shortcut they’re talking about is created from within Teams by selecting a folder and clicking Add shortcut to OneDrive.

Instead, you should’ve pressed Sync. Now, the two methods (sync/shortcut) are canceling each other out, meaning you can only have one method of synchronizing files activated at one time for a specific shared library. Therefore, we need to find the shortcut and remove it from your File Explorer.
How To Fix “You’re already syncing a shortcut from this library”
Follow the steps below to fix the problem.
Step 1: Find the shortcut
If you have OneDrive synchronized to your File Explorer, open up File Explorer to find the shortcut. Otherwise, visit OneDrive on the web. The shortcut can be anywhere in your OneDrive, but it will most likely be in the root folder – the main folder in your OneDrive, where all the other folders are.
Shortcuts have a small “link” icon on them. As you can see in the image below, I’ve synced a shortcut to the general channel of the Team that I can no longer sync. The shortcut must be removed. Look for any folder with the link icon in your OneDrive.

Bonus Step: If You Can’t Find the Folder (Scroll down for Step 2)
If you’re having a hard time finding the folder, there’s a little trick you can use. Go to the Team that you’re unable to sync and press Add shortcut to OneDrive. This will open a prompt that says you’re already syncing a shortcut, with a button labeled “Open Shortcut”. Press the button.
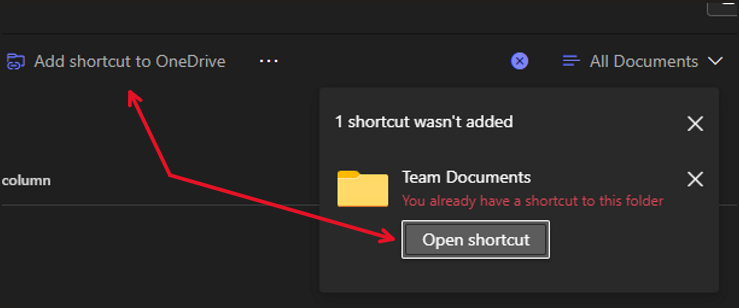
This will take you to OneDrive on the web. Press Home, then find the folder with the link icon on it and press the three dots next to the folder. Lastly, click Remove to delete the shortcut.
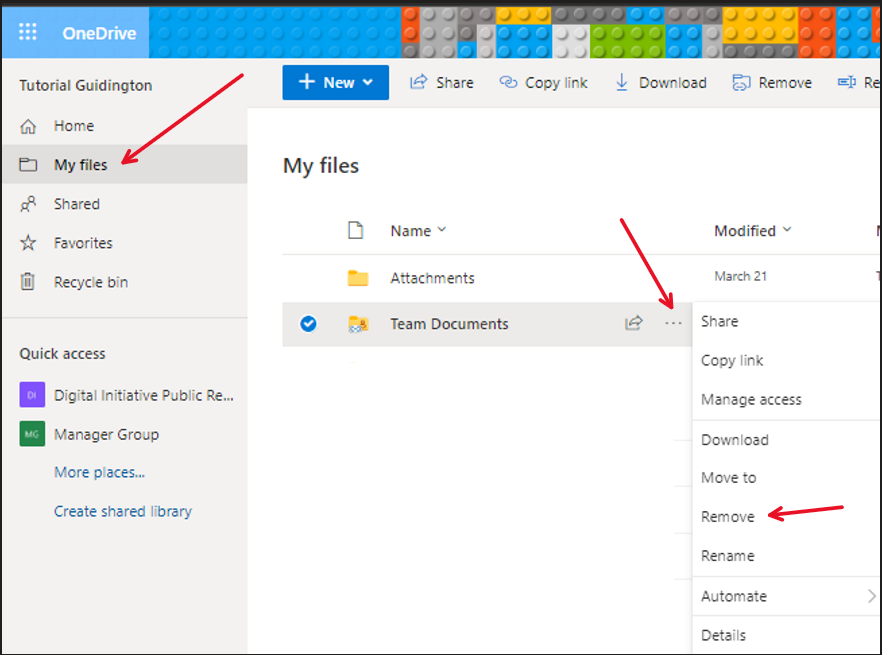
Step 2: Remove the shortcut
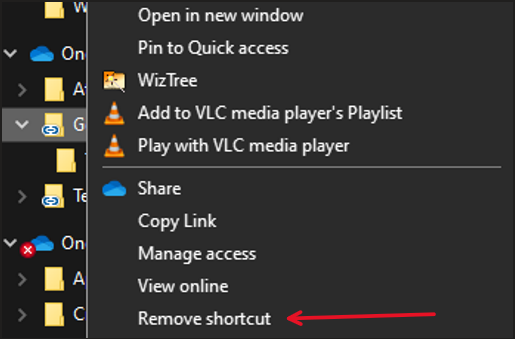
Because the folder is a shortcut from Teams, the folders and files within the folder are still synced to the Team. Meaning we can’t just click “Delete” – as that would delete the folder’s contents for other members of the Team too. Instead, we must right-click and select Remove Shortcut.
Step 3: Try synchronizing the shared library from Teams/SharePoint again
Give the linked folder a little while to delete. You should see files within the folder disappearing one by one until the folder is empty, then the folder will be deleted as well. Once that’s done, go back to the Team and synchronize the folder. You should be able to sync the library without issues now.
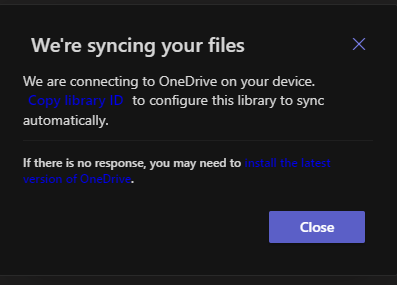
When you press the Sync button, this window should appear:
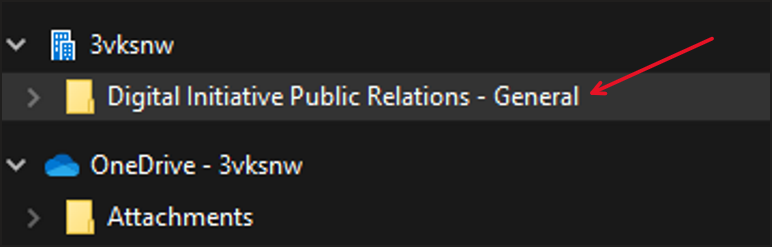
You can close it and open your File Explorer. Here you should see the shared library/folder. The name next to the two skyscrapers is the name of the organization. The first part of the folder’s name is the Team name and the last part is the channel name.
What’s the Difference Between Sync and Shortcut to OneDrive?
So, what’s the difference between these two functions? The result seems to be the same – the folders seem to be accessible from the computer’s file explorer regardless of the method used. However, there’s a difference that needs to be considered. Because you can’t do both at the same time, you’ll have to pick one.
To put it short and sweet: Synchronizing a folder allows your computer to access the files at all times, even without a network connection. The changes that are made while offline are then synchronized to the shared library once a connection to a network is established again.
Shortcuts, on the other hand, are merely links pointing to the original file. You can think of them as links placed on your desktop. The benefit of shortcuts is that you can create shortcuts for specific files you use frequently.
]]>For example, some people might have an old monitor lying around, and now they’re wondering if they can match that monitor with their new and shiny one. Can dual monitors have different resolutions?
Yes, you can run a dual monitor setup using two screens with different resolutions. Simply go into the Display settings and set your preferred resolutions for both screens 1 and 2, and you’re good to go. It’s not optimal to use two screens of different resolutions, however, because your mouse pointer will appear at a different point when crossing over screens with it.
If you have any questions or are curious about further details on this matter, keep reading. I will go over everything you need to know when it comes to using two monitors with different resolutions.
Also read: Should Dual Monitors Be of the Same Brand? & Should Dual Monitors Be the Same Size?
Can Dual Monitors Have Different Resolutions?
As I mentioned earlier, you can certainly use two monitors of different resolutions with each other. However, there are some things that you should consider before doing this.
The biggest annoyance when using two monitors with different resolutions occurs when moving your mouse pointer from the screen with a higher resolution to the screen with a lower resolution.
For example, if you have one monitor with 4K resolution and one with 1080p, you will have to move your mouse pointer to the top corner of the screen to move the pointer to the lower resolution monitor.
This is because Windows thinks that the screens are different sizes. Check out the picture below and you’ll see what I mean:

Here, you’re going to have to move up and to the left to move your mouse pointer from 1 to 2. When moving to 2 to 1, however, the mouse pointer is always going to appear in the top left corner of your 4K screen.
Unfortunately, there is no way to fix this unless you use an external program. More specifically, you need to use something called LittleBigMouse which is a free open-source project.
The application lets you transition more effortlessly from screen to screen and it’s the only program that I know of which lets you do this.
Oftentimes, monitors with different resolutions also have different refresh rates. This can be an issue depending on the monitors. For example, if you have one 144hz screen, that screen might cap its refresh rate to 60Hz while doing some things on your computer.
A lot of people have dual monitor setups because they want to play something on one screen while watching something on the other. In cases like these with two monitors with different refresh rates, your higher refresh rate monitor might play your games at 60Hz if you’re watching media on the other monitor at the same time.
There is a simple solution to this, however: simply disable hardware acceleration in your web browser. Since the majority of people have Chrome, I’ll take you through how to do it there.
- Click the three dots in the top-right corner of Chrome and select Settings

- From here, click System on the left-hand side
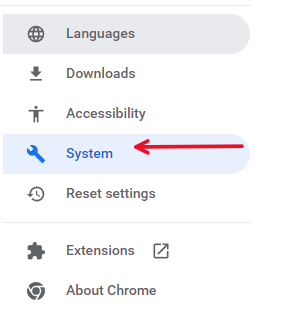
- Finally, uncheck the hardware acceleration option in the System menu
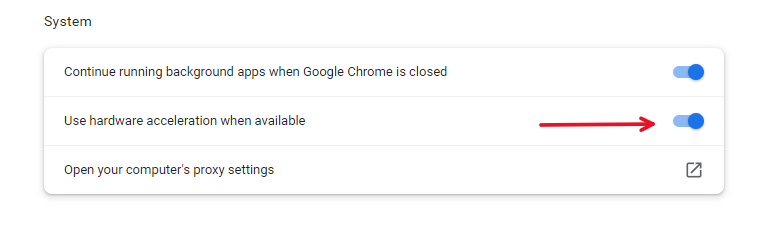
You’re done! Now you should be able to maintain the proper refresh rate on your primary monitor without any issues.
How Do I Set Two Different Resolutions on Dual Monitors?
Some people wonder how to access the resolution settings on their computers when using a dual monitor setup. Quite frankly, it’s very easy. Just follow the simple steps below.
- Right-click your desktop and select Display settings
- After this, you should see a preview of both your monitors (marked 1 and 2)
- To change the resolution for one of them, click on either the screen marked 1 or the screen marked two
- Scroll down until you find the Scale and then click the drop-down menu under Display resolution
- Set your preferred resolution
You can also choose to do this from either the Nvidia control panel or AMD’s Catalyst Control Center. I’ll go through how to do this in the Nvidia control panel since that’s what most people use.
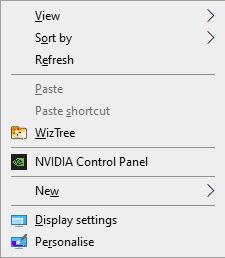
- Right-click your desktop and click on NVIDIA Control Panel
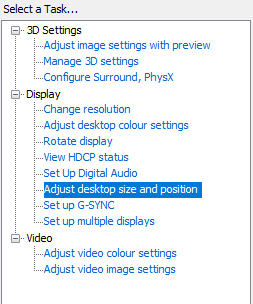
- In the menu on the left-hand side, click on Adjust desktop size and position
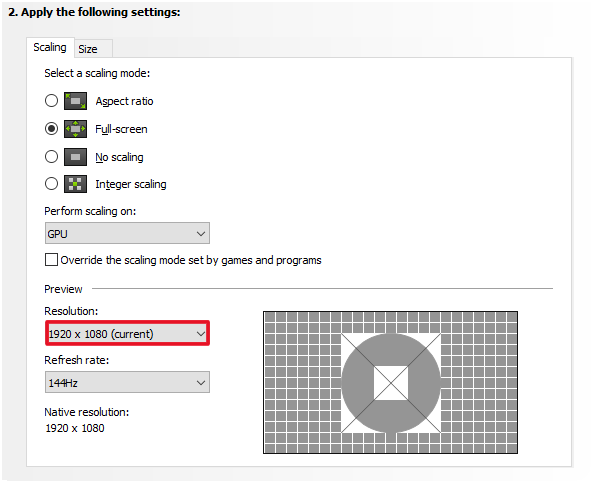
- Click on the display you want to change at the top of the new window, then scroll down and select your preferred resolution in the drop-down menu
Should You Use the Same Resolution for Both Screens?
While it’s completely possible to use resolutions with different resolutions, is it recommended to use two monitors of the same resolutions? Well, it depends.
If you want to avoid issues pertaining to scaling, colors, and such things, then using screens with the same resolution is advisable.
It can be annoying moving windows from one screen to the other, especially if you’re on Windows 10 (or some Linux environments). This isn’t an issue for all screens with different resolutions, since many people have reported that they’ve had no issues.
Some people find that having monitors with the same image (color sharpness, etc), refresh rate, and resolutions is a lot easier on the eyes than using monitors with different colors, scaling, sharpness, and so forth.
In short: worst-case scenario, you’ll have some minor problems with the scaling and UI using two screens with different resolutions, but you’ll most likely be fine. Most people use an old monitor as their secondary monitor, and it usually works just fine.
]]>The most common type of 4K screen is probably 3840 x 2160p, which is used with many Ultra HD TV screens. 3840 x 2160p is 4 times the pixel density of your typical 1920x1080p screens, so it’s quite an upgrade if you can afford it and run it successfully.
If you want to have a 4K monitor connected to your computer, however, you need to make sure that your computer can display it properly. So, how do you know if your computer can display 4K?
To see if your computer can display a 4K resolution, simply head into the display settings of your computer. When there, click the drop-down list and scroll down until you find the solution that you want to display. Your computer needs to be able to handle 4K and you need a monitor that is able to display 4K as well.
As you can see, checking whether or not your computer is able to run 4K is fairly straightforward. However, the prerequisites to be able to run 4K is slightly more in-depth. Let’s go through it in detail below.
Can My Computer Display 4K?
There are some prerequisites that you need to fill in before being able to run a 4K setup. One of the most important ones is your graphics card. It needs to support 4K in order for the resolution to work.
Even if you have a 4K monitor: without a GPU that can support it, it won’t work. Check before you buy anything that your GPU supports the resolution, and if not, what GPU you need to buy that does.
It’s easy to find out whether or not you have a GPU that supports 4K. If you have an Nvidia card, go here and look for your graphics card.
If you have an AMD card, it needs to have Polaris architecture or more modern technology. Remember that 4K support is not the same as gaming support for 4K. Polaris architecture is suboptimal for gaming in 4K.
Also, your processor needs to be fairly recent, especially if you have a laptop with an integrated processor. For example, Intel’s integrated processors need to be Haswell or newer. Go here to see the product specifications for any given Intel processor.
Furthermore, you’re going to need at least HDMI 2.0 or DisplayPort to use 4K, so check if your PC has those ports. Check the GPU manual or the GPU manufacturer’s website to determine this!
Of course, you’re going to need cables with those ports. That means that you want the proper HDMI/DP cables. Now, most of the time, a 4K monitor is going to come with a proper cable, but if not, you’re going to have to buy one.
There are a bunch of different places where you can buy cables like these. Tech sites or local stores should work just fine.
How to Check if Your Monitor is 4K
To check if your monitor is 4K, there are multiple options available. For one, you can simply check the box that the monitor came in and look for signs that it supports 4K. Since 4K is, well, the main selling point of such a monitor, it shouldn’t be hard to find.
Secondly, you can download MonitorInfoView. This is a tiny utility program that you can install to view information about your monitor. Supported resolutions, model of the monitor, product ID, and so forth. Moreover, you can also use the program to adjust brightness, sharpness, and other settings that your monitor may have come with.
Thirdly, you can visit the manufacturer’s website. Find the monitor you have on their website and check the specifications there. In general, monitor manufacturers/retailers have user manuals readily available there.
Finally, you can contact the manufacturer and ask, although that seems a tad bit unnecessary since there are multiple more easy ways to check.
Why Can’t My PC Display in 4K?
If you think that you should be able to display 4K and can’t, don’t fret: there are a couple of steps you can take to solve this. For example, you need to make sure that the scaling is properly set.
To check the scaling in Windows, simply follow the steps below.
- Right-click the desktop and select Display settings
- Under Scale and layout, experiment with different scaling settings to see what works best for your screen
Make sure that you have updated drivers for your GPU as well. If the drivers you have are really old, a lot of problems can arise. Simply download new drivers from your GPU manufacturer’s website.
Moreover, it’s advisable to install the latest Windows updates. Windows updates contribute to the functionality of your computer, and leaving Windows outdated for too long can cause issues.
Finally, using a different cable/port (try both) could be a solution to this issue. It’s fairly common that ports and cables break in some way so switch it up a bit to see if that resolves your issue.
What Size Monitor is Best For 4K?
The best size for your monitor depends on what you are going to use it for. For example, watching movies and shows has a different ideal size than a monitor that you’re going to use for gaming. With that in mind, what size monitor is the best for 4K resolution?
40” 4K TVs are pretty popular these days. It’s like having four 20” 1080p monitors stuck to each other on one big 4K TV.
But, as far as monitors go, I’d argue that there’s more variance. A computer monitor can be used for so many different tasks. As I said earlier, bigger monitors might be nicer when watching stuff, while something like a 27” monitor is very popular when it comes to gaming. Here’s a poll from Reddit, however, where most people seemed to like the 32” monitor the best.
Moreover, what size is best for you also depends on your budget. Naturally, two differently sized monitors with identical quality are going to differ quite a bit in price just because of the size difference.
I wouldn’t really buy a 4K monitor that is 24” or smaller. With sizes that “small”, the difference between 1080p and 4K is there, but it isn’t particularly noticeable.
]]>Many users wonder if their PC’s performance gets affected by the quality of their motherboard, and that’s a completely fair question to ask. Can a bad motherboard cause performance issues?
Yes, the quality of your motherboard can indirectly affect the performance of your PC. The motherboard determines what type of GPU, CPU, and RAM you can use. If you have an old or very cheap motherboard, that can mean that you do not have access to good parts to go with that motherboard. Furthermore, a bad motherboard can have various issues that can cause bottlenecks, delays, and more.
As you can see, the topic isn’t completely cut and dried. Keep reading to find out everything you need to know about motherboards as related to PC performance.
Can a Bad Motherboard Cause Performance Issues?
Motherboards can indirectly affect performance, as I mentioned. With a cheap or old motherboard, new technology might be unavailable. For example, M.2 SSD hard drives are new, very fast hard drives that require little physical space on your computer, and that’s awesome!
However, M.2s also require that your motherboard support them, and old motherboards don’t. In other words, you could have had a better hard drive, and therefore better performance, with another motherboard.
It’s also worth mentioning that a lot of people like overclocking components and to do that in an optimal manner, you’re going to need a motherboard designed for this purpose.
Of course, you can still overclock components with an old motherboard if the capabilities are there, but it might be riskier (and not worth your time).
All of the things I’ve discussed so far have been motherboards indirectly affecting the performance of your PC. However, bad motherboards can also affect your PC’s performance in a more direct manner.
For example, if your motherboard’s power delivery system is bad, then it might not be able to supply a sufficient amount of power to various components, and as a result, processes or the entire system may slow down or crash.
Can a Better Motherboard Increase Performance?
So, let’s discuss how a good motherboard may increase the performance of your PC. If you’re switching out a faulty motherboard, just about any new motherboard will upgrade your PC performance, of course.
However, a new motherboard can allow you to upgrade everything from GPU to CPU. Motherboards have different CPU sockets, and if you upgrade your motherboard to a new one, you have the possibility to upgrade your CPU.
This goes for your GPU as well: the GPU is connected to something called a PCIe slot, and if you have an old motherboard, a lot of new GPUs aren’t going to be compatible. By investing in a new motherboard, you can upgrade your GPU.
Furthermore, the motherboard also determines what sort of RAM is available for your computer. A new motherboard can allow you to upgrade your RAM. RAM is really cheap these days as well, so this can be an easy recipe for a performance boost.
What Are the Symptoms of a Bad Motherboard?
Bad motherboards can cause your entire system to be unstable and unusable. Let’s go through some of the ways that you can identify a bad motherboard.
The first thing you should look for, which shouldn’t be very difficult to spot, is when the computer fails to boot or doesn’t power on at all. Mind you, this could be a sign of other faulty parts as well, but the prime suspect here is the motherboard.
When this happens and the motherboard is bad, your might hear beeping sounds. Usually, when the motherboard is at fault, you should hear one beep, a pause, then a series of beeps. The amount of beeps in the series depends on what motherboard you have, so you might have to Google that.
If your computer randomly gets the infamous blue screen of death, freezes, or powers down, then your motherboard might be faulty as well.
Another common symptom of a faulty motherboard is when connected peripherals and other devices don’t respond when they’re supposed to, and if your computer has started to overheat recently.
Remember that these symptoms aren’t exclusive to motherboard failure, and it’s important to remember this. Other components and software bugs can also cause many of the issues presented above.
If you’re not tech-savvy, you shouldn’t try to repair your motherboard by yourself. Instead, take it to a repair shop to properly troubleshoot it.
How Long Do Motherboards Last?
Motherboards last for a fairly long time as computer components go, provided that they are cared for properly. For example, make sure that you clean your computer from dust and dirt, and have proper cooling installed in the computer.
How long a motherboard lasts also depends on what types of activities you usually do on your computer. A computer used in an office can easily last 20 years with the same motherboard, but an overclocked gaming computer’s motherboard won’t last as long.
That being said, gaming computer motherboards can still last for a really long time. I’ve had my budget gaming motherboard for 8 years now, and it’s still going strong, but I’ve taken good care of it.
A common reason for motherboard failure is humidity, so if you live in a place where it’s humid most of the time, you have to take more precautions than if you live in a place that’s drier.
Is it Better to Upgrade the Motherboard or GPU?
What PC part you need to upgrade on your computer depends greatly on what you’re looking to improve. For example, I discussed earlier how old motherboards don’t support a lot of new components.
Therefore, If you want to upgrade your PC and you have an old motherboard, you’re most likely going to need to upgrade your motherboard before anything else.
However, most new GPUs are compatible with a very large range of motherboards, so if your motherboard isn’t ancient and working fine, upgrading your GPU is a fine option, especially if you’re looking to play games on your PC.
It’s somewhat different if you want to upgrade the CPU to your computer because CPUs are a bit pickier when it comes to motherboards.
Is it Better to Upgrade the Motherboard or CPU?
If you have an old motherboard and want to buy a new CPU, be careful. As I mentioned earlier, new CPUs aren’t necessarily compatible with old motherboards in the same way that GPUs are.
That’s why you might have to upgrade your motherboard before upgrading your CPU. So, when considering whether you should upgrade your CPU or motherboard, remember that you might have to upgrade both.
Motherboards have different types of sockets for CPUs. If your old and new CPU uses the same socket, then you’re fine, but if the new CPU you’re looking to buy is much newer than your old one, then chances are that you need to upgrade your motherboard before buying that CPU.
]]>Many users wonder if it is possible to build a PC mixing any parts they want, and that’s a valid question. Can you mix and match PC parts?
PC parts are not universally compatible. Whether or not PC parts are compatible depends on multiple factors, such as the size and type of PC case and motherboard. However, most PC parts are interchangeable if they use the same connectors and standards. It’s very important that your PC parts are compatible with your build, because if they aren’t your PC simply won’t work.
There’s a lot more to this, and it’s hard to sum up in just a few words. Some PC parts are interchangeable, and others, like CPUs, have to fit the motherboard socket to function at all.
Read more to find out all you need to know about mixing and matching PC components. After you’ve read this article, you’ve hopefully gained some insight into what PC parts you can swap out and what PC parts you have to be more careful with.
Can You Mix and Match PC Parts?
Mostly, PC parts can be swapped interchangeably. For example, if you have an mATX motherboard, you’ll be able to fit a mATX motherboard in there, connect a GPU to its PCIe x16 slot and be good to go.
Modern GPUs are almost always connected through this slot on a motherboard, and if there are no physical restrictions, you can upgrade and swap GPUs without issue.
Just make sure that the case is large enough for the GPU to fit. GPUs need room to breathe as well, so there needs to be ample space for it in there.
However, there are some parts that can’t be swapped out without some consideration. If you mix parts without checking if you should first, you risk wasting money on parts you can’t use in your computer.
For example, some slots change more than others over time. RAM slots have changed quite a lot over the years, and they’re not generationally compatible. This means that you can not use a DDR3 RAM stick in a motherboard with DDR4 slots.
The slot and RAM sticks would be physically unable to fit. The same goes with CPUs, as we will get into later. CPUs have socket pins that need to be fitted to a motherboard’s CPU socket.
If you try to connect a CPU to a motherboard that isn’t compatible, it won’t work, but the worst-case scenario is that you break some of the pins which will stop the CPU from working at all.
Are All PC Parts Compatible With Each Other?
So, we can safely conclude that all PC parts are not compatible with one another and that you should do your research, even if you’re fairly sure about what you’re looking for.
Here are some of the most important things to take note of when building a PC or swapping out parts.
- Make sure that your CPU fits your motherboard CPU socket
- Control the size dimensions of case before buying a motherboard, GPU, or any other component that has physical demands
- Before buying RAM, see what DDR version your motherboard has and what sort of RAM speed and type your CPU works best with
- Make sure the power supply is capable of providing sufficient voltage
Do You Have to Match Brands When Building a PC?
When building a PC, you do not have to match the brands of the components. PCs are built with standards that every PC manufacturing company uses when manufacturing their components.
When you think about it, it wouldn’t really be possible. Far from every component manufacturer makes every part of a PC. For example, Nvidia does not make CPUs, and Intel doesn’t make motherboards.
If you’re very aesthetically minded and want things to look cool in your PC, it can be a good idea to match as many brands as possible I suppose.
Keep in mind, however, that picking a component just because it matches brands with another one of your components can lock you out of better options. To be clear, matching brands doesn’t provide you with any advantages when it comes to performance.
While it’s not necessary to match brands, there are certain things you should avoid. For example, Intel and AMD have different chipsets for their CPUs. Intel has pins on its chipsets, while AMD processors need the pins on the motherboard CPU socket to connect.
Can Any CPU Fit in Any Computer?
We have discussed this previously, but the answer is no. It’s vital that you check before you buy a CPU or build a new computer what socket your motherboard has.
This should be fairly easy to do. If you already have a motherboard at home, check the motherboard manufacturer’s website for information about what type of CPUs it supports.
You can also check the motherboard user manual and check there if you can’t find information online. Look for a list of compatible CPUs. After you’ve done this, check what kind of socket the CPU has.
The standards are usually just combined letters and numbers, such as the LGA 1151 standard for Intel processors (more specifically, Skylake, Kaby Lake, and Coffee Lake processors).
Can Any GPU Fit in Any Computer?
Pretty much every modern GPU is compatible with most motherboards since almost all semi-modern motherboards and newer ones have PCIe Express 3.0. Old standards like AGP and ISA are long forgotten, and pretty much every motherboard and GPU from 2004 and onward use PCIe.
While compatibility is seldom an issue when installing a new GPU, space can certainly be. If the GPU is too big for the case you have, then there’s not much you can do except for buying a new and bigger case.
Not only does the GPU have to fit in the case, but optimally, it should have room around it to prevent heat issues.
Another thing you’ll be facing when buying a new GPU is power demands. GPUs require a lot of power compared to other components, and it’s important that you have proper PEG connectors going from your PSU to your GPU.
You will be needing either an 8-pin connector or a 6-pin connector, depending on the needs of your GPU. Below, you can find some basic information on wattage estimates for different GPUs / PEG connectors.
| PEG Connector | Min. PSU | Recommended PSU | GPUs (examples) |
| Single 6-pin PEG | 350W | 400W | GTX 1660, GTX 1650 |
| Dual 6-pin PEG | 450W | 550W | GTX 980, GTX 970 |
| Single 8-pin PEG | 450W | 550W | RTX 2060, RX 5600 XT |
| 8-pin + 6-pin PEG | 500W | 650W | RTX 2070, RX 5700 XT |
| Dual 8-pin PEG | 550W | 750W+ | RTX 2080 Super, RTX 2080 Ti |
Can Any RAM Stick Fit in Any Computer?
No. RAM compatibility is largely dictated by their DDR generation, and the DDR generation of the RAM stick needs to match the DDR version of the motherboard.
Different DDR versions are not compatible, and you shouldn’t try to fit a RAM that doesn’t fit. It should be fairly obvious if a RAM stick fits in your motherboard or not because the sticks are physically different.
If you try to force insert a RAM stick in a motherboard that doesn’t support it, things can start to break, and that’s not what you want.
If you’re unsure of what type of RAM fits in your motherboard, I recommend using Crucial’s system scanner. It’s a small tool that you can use for scanning system specifications.
]]>